
Finally...we're on the way!...........
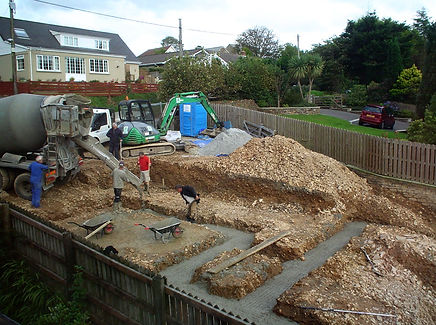
The wait was far longer than we expected, but at long last the project was properly under way. In the months before, we had 'lined up' our 'Main Man' Shane Seedell after he was recommended to us. He was and is a Blocklayer and Plasterer, but can turn his hand to most things. I felt straight away that he was going to be right for us, and so it turned out. He was going to bring along Paul Harper (who I have known for years) but whilst we were held up, he was employed elsewhere. So on the day, Shane brought along Tony Darrock, and we too got on really well. Tony would only be on site to help get us get ready for the timber frame, Shane would be on site much longer for all the rendering and internal plastering. The first thing to do was get the site base levels correct before putting in profile boards and marking out. Gary cracked on whilst we took turns driving the dumper truck up to the quarry with the spoil, it was 21st September.

By the afternoon, we were putting up profiles and marking out the footings, in the morning we would dig out the trench footings. The following day Colin turned up with his trailer, knowing that, with the amount coming out, he would speed up the job.


Because the concrete conveyor could 'only' reach 16 metres, the garage footings were not going to be dug until after the first deliveries had filled the lower parts. The flexibility and willingness of Gary was proving invaluable, he would slot in perfectly after one delivery, come in and dig the garage footing whilst the driver went to pick up another load of concrete. The ground in our area is made up of 'shellet', which is basically broken stone, and it is impossible to dig out trenches with straight sides. It is nevertheless a good solid base, but you do tend to use more concrete because the sides slope outwards, a 2' wide footing unavoidably becomes almost 3 feet wide at the top.

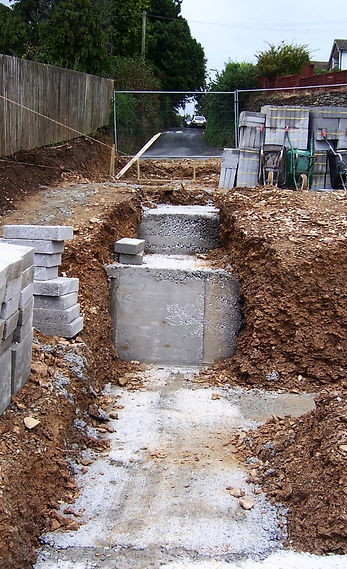
Having dug out most of the footings that day, September 23rd, I had a call from our neighbour at Trevissick in the evening, to tell me that he had measured the distance from our profile to the fence, and we were in the wrong position. I went around to his house and he showed me a letter that he had from planning, saying that our house would be 2.4 metres from the fence. We were 0.2 metres or 8" nearer, and he wanted us to move it, despite my appeals, he would not give way. I had not been copied with that letter, and we had applied for the new planning with the site plan showing the house central again. However I could not risk him appealing and possibly succeeding, after we had started to build, and so decided to move it over. The following morning Gary had to increase the width of the footing, it was very difficult and very messy. It would cost me dearly in extra concrete, probably 4 cubic metres, £400!


The truck driver from Fahey's, Adrian Omlo, was so accurate with his delivery, Shane and Tony hardly needed to get in the trench to level out the concrete.

As you see in the picture to the right, when filled to the correct depth, the width of footing and the amount of concrete we had to use was considerable, around 20 cubic metres in total, around £1800. It would certainly provide a good anchor for the building! After two deliveries, Gary did his stuff and quickly cut the garage footing, but as the last load was unforseen and the conveyor truck was booked elsewhere, we had to have the delivery by standard chute. All hands to the wheelbarrows for this one, including new neighbour Steve Evans.
A full load of trench blocks had already been booked from Denis May's, and the following morning they arrived, and we set about stacking them around the footings ready to lay. The loose shellet continued to fall in onto the concrete which was dry by then, it didn't look pretty, but it was good and solid and substantially more than was required.

Over the following days, Shane and Tony mixed up and laid, and I kept them topped up with blocks.
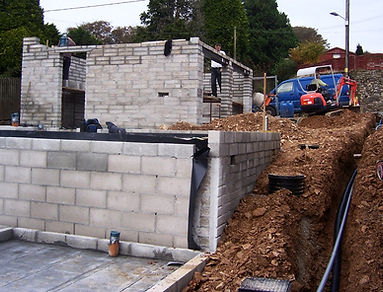
Progress was good with 300mm trench blocks, though you do use a whack of mortar, so you are continually mixing up. You can see the result of moving the position of the house foundations in the picture to the left where you would normally see only around 150mm of foundation exposed, here there's more like 3-400mm.


The Architect had planned for concrete base over hardcore, but Shane and Tony both thought this was 'old hat' and we ought to change it to beam and block. After a bit of research I agreed, Chris also agreed it was a reasonable course of action. As the blockwork cured, I used the shellet to back-fill around the foundations.


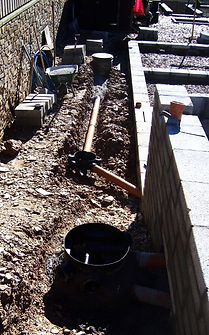
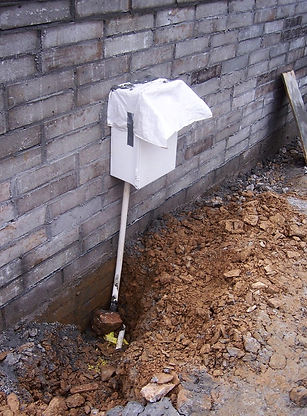
One thing that has complicated this build, is the half storey height change in the centre of the house, the block wall in the centre was not designed for retaining, just for supporting the floor of the upper level ground floor, now being beam and block. Another wall (with a cavity) would be built next to it, with the timber frame to full height beside that. The oversite under that section was therefore sloped down to the foundations to ensure that there could not be any side pressure on the wall, or transmission of damp. I started to install the connecting chambers and sewer pipes, the internal parts of which would soon be inaccessible under the beam and block. I used a plan produced by Bodmin Concrete Products, who were going to supply them, to make sure the upstands did not coincide with the beams. Where gaps had been left in the block to ventilate under the floor, I started to position sheets of 'SureCav'' as in the photo to the right, this allows air to circulate after back-filling.


Next to arrive was the floor beams, mechanically off loaded, but manhandled into position by as many bodies as we could gather, the longest were a bit of a struggle, but we managed it. This was quickly followed by another full delivery of 4" blocks from May's to drop in between, it all went to plan. The ring of 6" dolly blocks was laid, these support the sole plates and had to be spot on, the level had to be within 5mm!

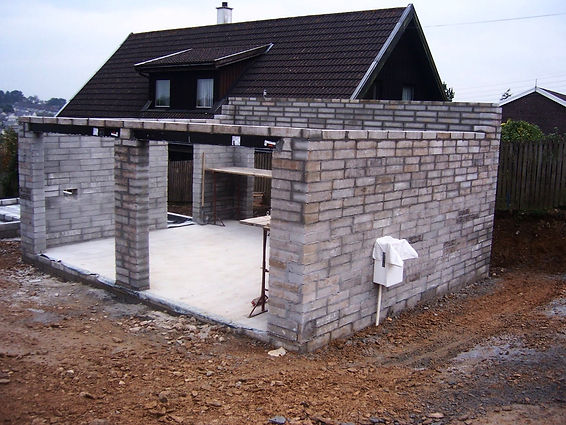
We moved on to the garage, the walls of which would be solid block laid on side, with no cavity. I was a bit concerned this might be damp, but time has shown that a coat of render and paint is enough to keep the inside dry as a bone. The timber frame people wanted this up to roof level as the connecting porch frames would be attached to it, and the roof cassettes would carry straight across both. I had already laid the section of underground pipe diagonally across, to surface externally by the front corner as the stack vent. After constructing a radon collector, piped out to the side, the area was back-filled and consolidated. After sand blinding and radon proof membrane, concrete was laid with steel mesh for reinforcement. I had miscalculated the mesh, forgetting about overlapping, but luckily a bloke up the road had previously offered an offcut he had from his job that was surplus, Tony went over to see if he still had it, he had, and it was just enough to finish the job properly.
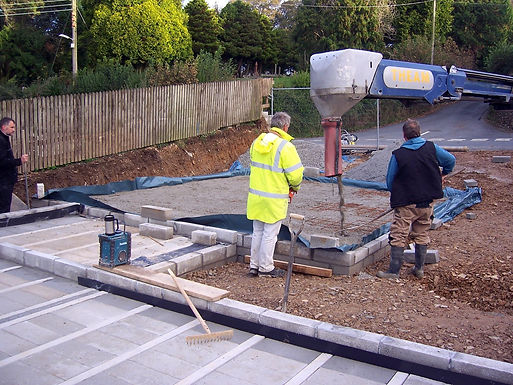

We hired a 6 metre roller screed to level it out, difficult any other way being 6M x 5M, but an expensive item at £105 for about an hour of use! The same day, we grouted the block and beam floor with a 1:1 sand cement mix, brushing it all over with a broom. The following day when it had gone off it felt so different, no bounce at all. Next, the garage blockwork.

After another delivery of blocks and sand, Shane and Tony cracked on with the garage blockwork. The inside face of the block was going to be painted, so it was important to keep that face 'pretty'. Before we had got too far, I remembered that the German steel front door and frame combo did not have post flap in it, so a slot was left out of the wall to fix a plate to the outside, with a post basket inside.


Whilst this was going on, I needed to get in the services and dig another soakaway, this time for the front section of the house, the garage roof, and the drive. This had to be dug a minimum of 5 metres from the house, which forced it into the top right corner of the plot, which was already more than a metre higher than the garage floor. This entailed digging down as far as Gary could manage, and it got so hard, I thought the bucket teeth would break.
The soakaway consisted of another 14 Polystorm Cells, 2.66 cubic metres of void, and as the base was in broken rock which dispersed water immediately, I had no concerns regarding adequacy. Before covering in geotextile and back filling Gary dug two trenches, one to the corner of the garage and one to the corner of the house. Pipes were laid, protected with pea gravel, and backfilled. I had previously contacted both the water authority and BT to line up installation of services. BT had delivered ducting and cable, and don't charge for it, South-West water told me how to install my own pipe and ducting, and asked for just over £1500 for the pleasure of being connected later. I had also contacted Western power, who supplied a meter enclosure, and charged me around £950. The Gas suppIy took quite a while to sort out the with Wales & West Utilities, they were very confusing, being very indecisive about size of supply needed and consequently size of yellow ducting I would need to put in (which we had to provide). The meter box was planned to be on utility room wall, so we were just a metre or so into a higher charge for connection, at £680. As the garage was going to be the first 'completed' bit of the house, we were going to get power into a consumer unit in the garage, and when the house progressed, feed a sub main in to the house consumer unit. We were relying on power and water from the Evans' in Arlington, and were hugely grateful for that. They did reluctantly accept some payment from me, but we'd have been lost without that help. It was a bit tight for space now, so Colin Bilkey arranged for a mini-digger to be delivered, and Rob to drive it. Over a couple of days we got all the services in within ducts. When the blockwork was high enough, we asked WP to come and connect us. I have to say the Engineer couldn't have been more helpful, a trait I eventually found in every person that came to connect us, water, gas, phone...and electric of course.


With only six days to the planned delivery of the timber frame, our chosen scaffolding erectors, M&M from St Austell, arrived and started to build a the platforms as we had instructed. The cost would be around £2.250 for 12 weeks, each week beyond that would be charged extra. Frame UK had requested the scaffolding to be 150mm outside the block walls so that the timber frame could be built within it. As it turned out, the erectors had put it up too close and had to adjust it, but in fairness M&M always sorted out any issues and adjustments promptly.
It was now 23rd October, and the garage blockwork was nearing completion, waiting for the Architects final instructions for the wall plate heights to achieve the correct roof pitch. After another visit by Gary to level out and consolidate the area around the garage, and Colin to take away more spoil and bring back some quarry chippings to create a hard standing for the crane, we had a good clean area to work.
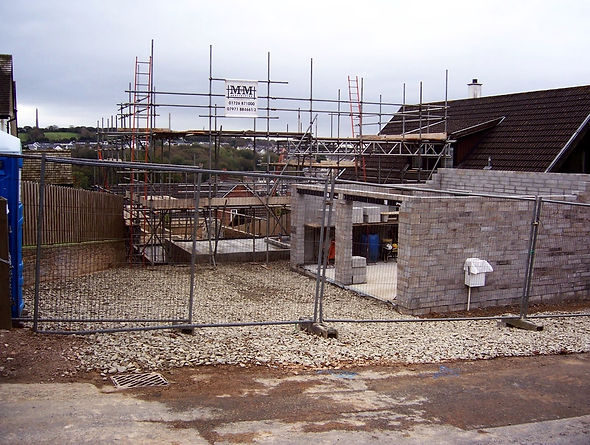
At close of play on Friday 26th, we were ready for the timber frame the following week. Shane had set up his trestles inside the garage to lay the wall plates (when position agreed) and continue the 5 degree gable wall upwards to meet the roof cassettes.

Since cutting the ground and setting out, to timber frame ready took 35 days. We had experienced reasonable weather for the time of year and got on well. I couldn't have asked for better people to work with, it was an enjoyable time for me. I hoped that would continue......

