
First fix.....beyond the timber frame.
With a lead time of around 13 weeks, we knew that as soon as the plans had been put to bed, we had had to get the windows ordered. After visiting all sorts of exhibitions and trade stands, we came across DSL Ltd (DoorStop South West) near St Clements, just outside Truro. They were in the midst of reconstructing their new showroom, and had built different windows in displays and the building itself. I had a quote from 'Ian Woodman' for supplying and fitting 'West-Coast Windows', which were very competitive, but on looking around the showroom I noticed they had fitted 'Internorm' (Austrian) tilt & inwards opening windows in parts of the building, which I had seen elsewhere. With dark grey powder-coat aluminium outside, and off-white timber inside, some with integral blinds, we were impressed by the style and quality, so he also provided a quote for them. We were also in the market for two sets of folding sliding doors (2.4 metres and 4.8 metres wide), in the same alu-clad colours and format. He provided a quote for these too, from a German supplier, Solarlux, which he highly recommended. He also priced a triple glazed option for the whole Internorm/Solarlux window and door package, the difference was so small, we just had to go for it! As we would all be busy, it made sense for the experts to fit them, that way any damage was not our immediate problem, and as VAT would not be chargeable for 'supply and fit', our immediate outgoings would be reduced. The windows arrived by large vehicle to Truro, were transferred to our site in their trailer on 5th December, and were all fitted during the next two days. The folding doors would have to come later as they could not be fitted until the balcony was built.


We were pleased to see Shane join us back on site on 3rd December, and he began rendering the garage walls. We decided to use stainless steel angle beads and render-stops throughout the job, having experienced unsightly corrosion and staining with the galvanised alternatives in previous projects. The most immediate task was to make the building dry, not easy with two large holes where the folding doors were to be fitted, and a balcony deck that was unfinished. I had put up sheets of ply to keep out the weather temporarily, with limited success. Before the doors could be fitted, the balcony walls had to be constructed, and my Carpenter, Clinton Crotty, would not be joining us until Monday 17th December. The balcony deck could not be properly finished until the stub walls were built, and the doors could not be fitted until the balcony deck was laid. The original plan for the balcony was to surface with layers of mineral felt, with concrete slabs laid over. The thought of the felt eventually breaking down and leaking in to the kitchen filled us with dread, and we decided that we would have a glass fibre floor laid instead.
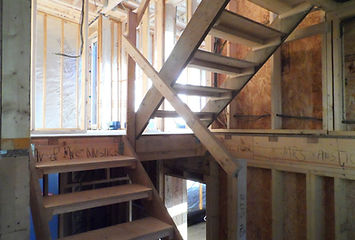
Meanwhile, I had called M&M to remove the garage scaffolding, as it was too awkward for Shane to get around the back wall, but in the end I stripped out the scaffolding myself rather than hold him up. To assist in getting around the house safely, I used some of the materials left after the frame build to make temporary flights of stairs, which proved to be invaluable in the coming months.


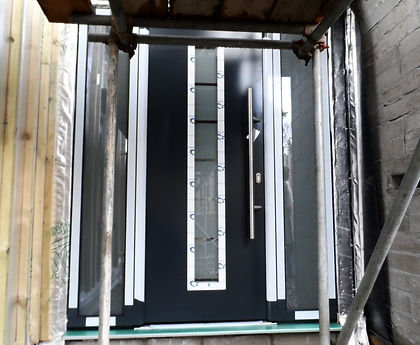
The garage doors and front door set arrived on 11th December, from 'South West Garage Doors'. As with the windows, the order for these had been placed months ago, we had chosen German 'Hormann' doors from a Bodmin based company, and for the same reasons as the windows, chose a supply and fit package. A bit of amusement arose with this order as, when we placed it, we thought we had chosen a series of square windows vertically up the side of each of the main doors. When they arrived, the stainless trims were applied but no windows.....I thought perhaps that they would be cut in on site. Ian, from SWGD called in and told me that we could not have ordered windows, because they would have added around £700 per door to the price. What we had ordered were 'design elements', which we had mistakenly viewed in the brochure as windows, still pricey though. He knocked a bit off the price, and we weren't too upset by it. The fitters were friendly and efficient, and all doors and motorised automatic openers were fitted by the following day. The one problem we have had since (nearly 4 years on) resulted in them quickly replacing a failed motor head (which apparently is almost unheard of) under guarantee.
Clinton arrived as planned on Monday 17th and started work on the balcony, using materials provided with the timber frame package. The ply deck was slightly sloping to either side as it was laid on firring pieces, and whilst Lee (from WH Joce) was on site I had him make two outlet hoppers out of Zinc, to incorporate into the walls on both sides.

Clint had finished the balcony wall within a couple of days, and he went on to start battening the outside in readiness for the cladding. Finding someone to Fibre-glass the balcony was another matter, there are only a few businesses in the area that will do it, one local roofer gave me a ridiculous price and then told me he couldn't do it for a month or so! Eventually I found a Company called 'Shapes GRP', a guy called Neil Hayden from Bissoe near Truro. As it was almost Christmas, he could not look at the job until early in the new year, we had little choice (frustratingly) but to wait. He would require the decking to be dry, and currently it was completely soaked, so I worked the scaffolding a bit to allow me to erect tarpaulins. With the wind and rain that time of year, it was virtually impossible to keep the weather out.
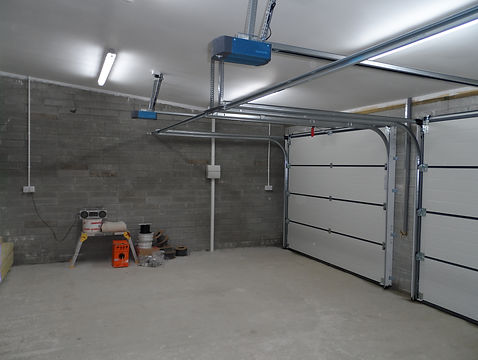
The Electricians arrived on 3rd January, Peter Ford and his Mates, Charlie and Joe. The meter would not be fitted until 7th, but by early afternoon all the electrical work, including the garage consumer unit, was completed, and we were ready for the connection to be made. On the 7th, an installer from EDF fitted the meter, and for the first time we had our own supply. The same day I painted all the garage external walls.
It wasn't until Saturday 12th January 2013, that Neil was available and the deck was dry enough, and even then he had to use a very large blowtorch to completely dry the surface. He started off by fixing GRP right angled upstands around the whole area including the door cill, then he applied a resin to the deck and into the corners and the up the upstands. Onto this he laid glass matting and used a roller and more resin to bed it in. After drying for a while, this process was repeated. The upstands, Zinc outlets and floor were now effectively sealed into one waterproof structure, and it became transparent as it dried. When this was completely dry later, he applied a grey gel coat and scattered some sand into it to make it non-slip. The job was very smelly and messy, but the result was absolutely spot-on. At long last we could now have the doors installed to make us weathertight and secure.


DSL responded to my call quickly and on Tuesday 15th, they delivered and fitted both sets of folding doors. It was the first time we had actually seen a Solarlux door 'in the flesh', and we were most definitely not disappointed. Meanwhile Shane had finished rendering the garage and had left site until needed again, and Clint was cracking on screwing 50x50 tanalised CLS battens on the whole exterior of the house. This would support either cedar wood cladding or 'rendalath panels', which would then have cement render applied to a thickness of 20-25mm. A section of the frame from the front corner to the 'ear' was so out of plumb, we called Brian and Chris to have a look at it.
Only Brian turned up the following day, and we protested about the time it was taking (and costing me!) to overcome their poor workmanship, but in the event all he offered was sympathy and a delivery of spacers to gradually 'shim out' the error. Clint carried on, it was all very well making adjustments to correct on the outside, but we would have to do the same inside too.

Shane was back on site Thursday 17th, and between us we put up the plasterboard on the garage ceiling, and on Saturday afternoon, with help from his friend Ben, he plastered the ceiling. by Tuesday evening I had applied two coats of paint. Also on Tuesday, the 'Caro Supports' had arrived, the system I had bought for laying slabs on the balcony. I began laying these down the following day, it was simplicity itself, with shims included to cope with any variance, and the beauty is they can be lifted up at any time for cleaning out or carrying out repairs. I laid the balcony floor out in one day including cutting.


on 25th January, the Electricians returned to start wiring the main house. Prior to this Elaine and I had spent many an evening deciding what sort of lights we wanted, how many of them, where we wanted them, and where we wanted plugs ...etc...etc...etc..When you have a lot on your plate already, this becomes a bit of a nightmare, but it is well worth the effort thinking it through properly before you hide all those cables. On Thursday 31st, all their work would be done.
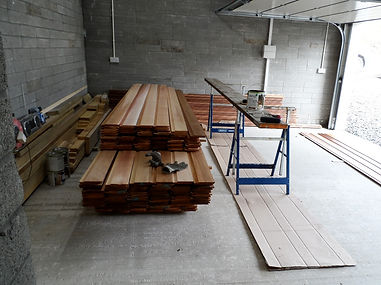
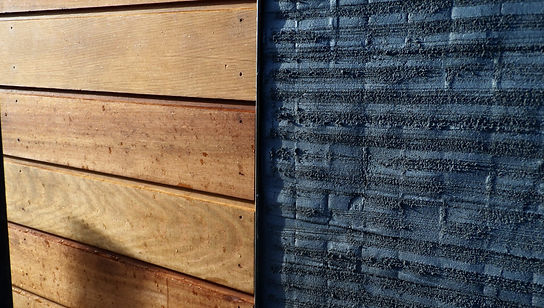
Well before this point, we had ordered the cedar planking for the cladding. From a variety of groove styles, we had opted for a contemporary square groove, referred to by the supplier as 'VT-10', with the bottom tapered slightly to shed water. On 30th, all 963 metres of it arrived, and having cleared out the garage, we stacked it indoors ready to pre-treat. We did not intend to leave the timber to weather, many Architects wax lyrical about the beauty of naturally greying cedar, but I didn't enjoy going grey myself, and I wasn't prepared to subject my cladding to the same fate. We used 'Osmo UV Inhibitor', which is an oily substance that limits the reaction to light and retains the colour over a much longer period. During the next few days, we would give every inch a first coat under cover in the garage, and would give it a second coat after it had been fastened to the house.
Also on the 30th, Rob Button, a plumber recommended to me by Shane, arrived to look at the house, and to see what we would require from him. He looked at the plans, we talked for a while, and he accepted the job. Like Shane, Clint and Tony early on, he would be working on an hourly rate. I have to say that though this does expose you to a lack of cost control, no-one ever made me regret this relationship. Rob expected that he would need to start in around three weeks time.
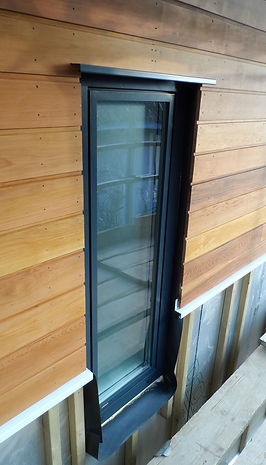
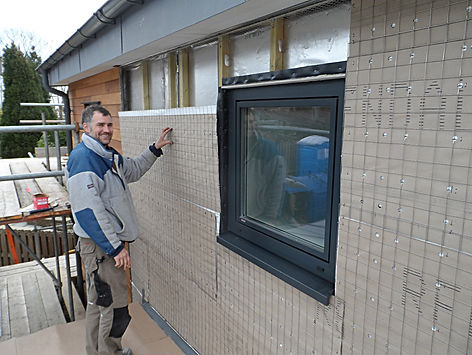
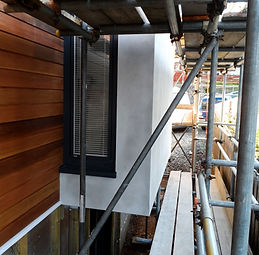
Clint had finished the external battens, and was now turning his thoughts to the cladding, and how we would deal with the transition between the render sections and the cedar. In addition to this, the windows did not come with cills, and we had to decide what type of cills we would use. Our Architect didn't offer much guidance, so I had to do a little research, and came up with 'Spectrum Installations', who (as well as selling windows) offer a service of bespoke aluminium cills and trims in powder coat colours of the customers choice. We ordered all the cills and top drip bars to match the windows, for fixing in both render and timber situations. After discussions over the phone to explain to their designer what we wanted to achieve, we also ordered 'transition beads' (same profile as the drip bars) in a similar white to the wall paint, to fit where the cedar sits above a render section of wall. These came with prefabricated joining pieces and corners as shown in the photo to the right. An elegant solution, and it was all delivered to site in around a week, absolutely fantastic!


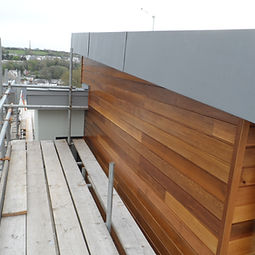
Clinton began fitting the cedar cladding, a painstaking job as he had to pre-drill every nail fastening (special stainless steel annular ring nails were used to eliminate staining). We immediately decided to stray from plan a little here as the balcony walls were shown as being rendered, and this was not very practical. We had plenty of cedar and decided therefore to clad the balcony walls, inside and out, it was a good decision as it looked right, made installation of the balustrades much easier, and cleaner as there was no 'wet trade' work over the slabs. By now the MVHR and electrical first fix had been carried out, so I had the job of insulating the roof, I would need to put in both 100mm and 150mm layers to fill the roof space. This was most unpleasant work pushing it up from below, because even with a mask, hat and goggles, inevitably I had a sore and itchy face for days.
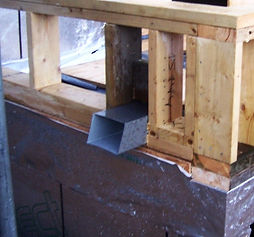
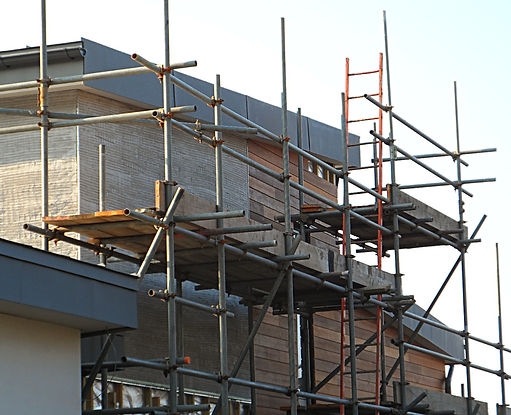
The balcony balustrade was designed in Stainless Steel and glass, and we had received quotes from national companies, but after a bit of research we came across a local company called InSteel in Redruth. They had produced a competitive quote, and included for supplying and fitting a powder coated aluminium coping to the wall. On 5th February, their MD Ian Nicholls arrived to measure up, and to discuss the methods they would be using to keep the structure weathertight. The join between the walls and the coping concerned me particularly. He quickly designed a 'shroud' that would ensure that rain was kept from penetrating into the wall below. He had these fabricated a few weeks later and Clinton installed them as shown in the photo to the right.

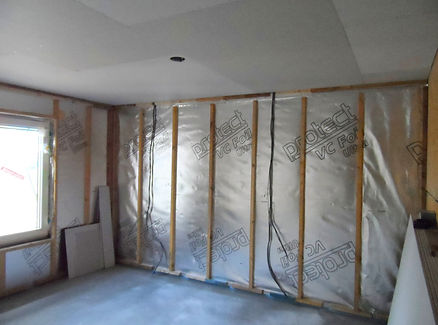
The disadvantage with stud-work internal walls is of course when it comes to put up something heavier than a picture. We had thought about this, and decided that we would screw 12mm ply sheets to specific areas, before covering with plasterboard, where there was a known benefit in doing so. We did this on three walls in the kitchen (kitchen wall units), the cupboard in the utility room (heating and plumbing pipes and fittings, also shelves), and two walls in the study (shelves in the cupboard and office wall units). I also fitted sections of 22mm ply (from roof off-cuts), into specific positions in the bathrooms (for hanging sinks and wall units) and where televisions would be suspended on brackets in the bedroom and the kitchen. All of this worked out brilliantly in the end and was well worth the cost and effort.
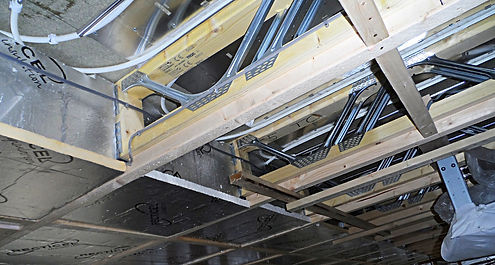
The components for our Nu-Heat underfloor heating system had been delivered, which I have written an account of separately, but to save time and cost, I had begun screwing up the 'clippaplates' (aluminium heat transfer plates) into the underside of the first floor decking. It was all done within a couple of days, and ready for the plumbers.
Shane returned to site on Monday 11th February, he plasterboarded the cupboards in the utility room and the study, and plastered them in readiness for the plumber, as heating manifolds and other plumbing would be screwed to the walls in both places. I also got two coats of paint up, easier than trying to paint around everything later.
Clinton had gone as far as he could with the cladding (waiting for shrouds), and came indoors to help Shane prepare all the noggins for plasterboarding. The following day we went off to Fuertaventura for a week, and closed the site whilst we were away.


The first morning back from holiday, 'May Gurney' arrived to dig up the road, fit a meter, and connect us to our water supply. Good guys, all done very quick and efficiently! Shane and Clint had things to do whilst we were closed and until the end of the week. The Manager of our chosen suppliers for our stairs, door linings, skirting and architraves, Charlestown Joinery (John) arrived to take final measurements for the door linings As with most of our material purchases, we had shopped around and had a good idea of prices around the block, and this local company had been recommended to us, and quoted competitively. We had chosen American Oak for all the second fix 'stuff', the staircase would be made from Oak, with toughened glass balustrade panels set in stainless blocks.
Monday 25th, and back to business full strength. Rob Button, our plumber arrived to start first fix, John arrived with the door liners and window sills, and Shane and Clint arrived back on site. They would both stay with me now full time for the next couple of months, Clint even longer. Everything was in place for Shane to board and plaster the upper floors, and Clint carried on with the cladding, and fitting door liners ahead of Shane. Rob and his mate Dave started by fastening up the heating manifolds and laying the upstairs underfloor heating pipes into the 'Clippaplates' that I had already fitted. They then cracked on with the hot & cold water pipes and wastes, the only upstairs room with pipework is the ensuite, the walls of which would not require plastering, just the ceiling. They were therefore not holding up Shane. We had a good system going where, I was working in and around the house, and Shane would shout when he needed a lift with a sheet of board. By March 1st, Rob had first fixed as far as he could go, and pressure tested the H&C and heating pipes before leaving site until we called him in for the downstairs heating pipework.

We had decided to fully tile the walls in the in the en-suite and bathroom, and therefore used 'Fermacell' board which was much stronger and more expensive than plasterboard, and would not require plastering. The master bedroom and en-suite were the key rooms, we were hoping to move in as soon as they were usable, as we just hated the place we were renting, and really smarted at forking out more than £600/month for the privilage!
March was a real...go-for-it month, when I look back so much happened. Over the previous months we had selected tiles, and had them on hold awaiting delivery when needed (everything came from CTD, Ceramic Tile Distributors, part of the same Group as Jewson). I was intending to do the tiling myself, but as I was already busy enough, I asked the Lads if they could recommend a Tiler. Rob recommended Simon Taylor, I gave him a call, and after discussions we agreed a price for the job.

Simon told me that the floor tiles would need to be laid on a dry floor, and that I ought to get the lower floor screed laid sooner rather than later. That in mind I rang around for prices and agreed terms with 'JH Lidstone', for the work to be done 18th March. A screed of 65mm would normally need between 1 and 2 months to be cured and dry enough, I was annoyed at my tardiness for not considering this properly. I discussed this with Lidstones, and they offered an advanced quick curing screed with a 'Mapei' additive, which would reduce curing time to around two weeks, the price for the job was £1.6k. I had to go with it. I ordered the 100mm celotex floor insulation and DPM, and over the next couple of days layed the membrane (sealing it to the DPC using silicone), and the floor insulation. I had called Rob, and on 14th he and Dave arrived to lay the underfloor piping on top of the insulation. and completed it all during one day.


The following day, Lidstones had a pumping machine and delivery pipes delivered to site, ready to screed on On Monday, Shane was putting up angle and stop beads around the external areas that he could now start to render whilst the weather was kind, and Clint was fitting window cills, and carrying on with cladding the front East wall. A lorry arrived with the screed, which was tipped at the side of the pumping machine. The mix was quite dry, apparently it had fibres, and a retarder mixed in it to increase workable time, and the'Mapei' additive to cure it more quickly.

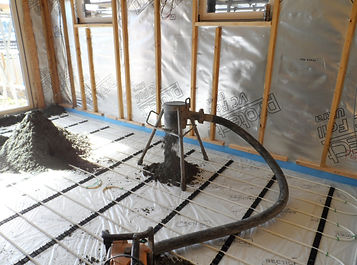

The two Lidstone guys worked perfectly as a team, the Labourer was always one step ahead of the Screeder. I was intrigued how the pump worked, I would not have believed it possible to pump something so dry and heavy. The supply pipes twitched and lurched around, I had to protect the doorway to stop it causing damage there. By 5 pm the whole ground floor was finished, there was still some screed left over, which I distributed around the site. The machine and pipes were uplifted the following day, a good efficient service and an excellent level floor. We put down sheets of ply to protect the main path of traffic whilst it was curing.
The stainless steel 'Rendalath' had arrived, and Shane started preparation of the first upper floor render sections. It was the first time I had seen rendalath and I was surprised how flimsy it appeared to be. We used around 80 sheets at just under £30 each, so it was a sizeable purchase. The sheets were fastened to the battens, with special stainless staples, the prongs nailed either side of backing rods. The staples were also pricey at nearly £90/box, we used four!

It was quite surprising how firm and substantial the Rendalath became with just a scratch coat of render. and with the second coat applied, even better.
After 5 days, the screed had gone off well enough for Shane to go back indoors and start plasterboarding downstairs. The gas fire had arrived, so Clint left the cladding for a while to build a fire surround so that Shane could finish boarding the lounge.
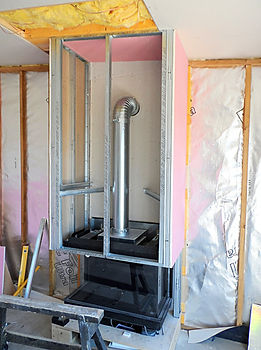


We originally wanted to put in a log burner as a focal point for the lounge, and in the design, the weight of one had been taken into consideration. When we went to order one, we were given the news that we would require a rather ugly flue of around two metres above the lower roof, because reguilations demand it had to be a metre above the upper roof. We could not live with that! Not that we needed a fire other than for 'effect' because the house was designed to be warm, and is, but I like the smell of burning logs, and the whole 'medieval thing' of finding logs, getting the chainsaw out, and squirreling them away to season in a neat stack. Anyway....so a gas fire it had to be, but we had an idea of how we wanted it to look. We hunted around and found the three sided fire we had in mind, a Dutch made 'DRU Scenic'. Once it had arrived, Clinton and I mulled over how we should create a surround, and decided to use metal studwork, with fire resistant plasterboard (hence pretty in pink!). The fire breast has vents either side so that any convected heat can escape from the enclosed space. We planned to have a slate hearth cut around the fire like a shelved area shaped around the glass. Shane could finish off the lounge now, and Clinton went out to carry on with the cladding, he had suffered some shocking weather, but the end was in sight now. We were also overdue wth the scaffolding, or rather we were paying extra each week as we were beyond the 12 weeks standard contract, and when he finished, it could come down.


Now that we could get downstairs to work, I set about putting in the insulation in the kitchen, to the underside of the balcony and main steel support. But first, to ensure we had enough, the whole ceiling had to be battened out to lower the ceiling enough to be able to insulate the steel. Finally the whole beam was clad in Recticel to prevent the formation of condensation.
The whole downstairs ceiling space had to filled with 100mm fibre wool insulation, this was to ensure that the heat from the first floor heating system pipes and clippaplates was radiated upwards rather than downwards to make the heating upstairs more effective. At this point we decided on a slight deviation from plan in the downstairs bathroom, rather than box in the soil pipe in the corner, we decided to angle the corner. This would not only enclose the pipe more neatly, but as the WC would be set at an angle, it would make a more interesting room plan. A reasonable sized hole could be left to access the soilpipe junction, as this would be behind a unit style cistern. I then filled the walls, as I had already done in the upstairs en-suite, with accoustic insulation (you don't really want to hear what's going on in there!). A small window (made by Charlestown Joinery) with obscure glass was built in to allow natural light in from the porch.

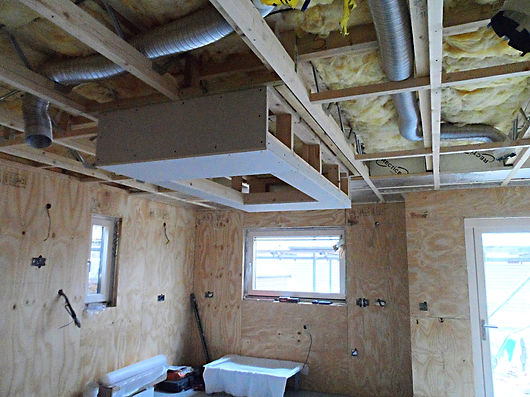
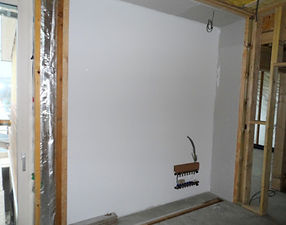
The MVHR is 'man enough' to take away kitchen steam and smells, but it is desirable to keep the ventilation pipes as clean as possible. With this in mind we had decided to put in an extraction unit above the hob, which would be the main source of steam. We wanted to make a bit of a feature of it, so we built an enclosure projecting down from the ceiling, the same dimensions as the island was going to be, into which the extract unit and four spotlights would later be fitted. You will also see in the picture left that the kitchen walls have also been covered in ply at this point prior to plasterboarding.

The master bedroom and en-suite were plastered ready for our occupation at the earliest opportunity, well that is as soon as Rob could get a hot water supply set up. Shane was prioritising the upper floor rendering when weather permitted, so that I could get to paint it, and as Clinton, after briefly coming in to second fix our bedroom was close to completing the cedar cladding, we could soon have the scaffolding removed. I finally painted the ear, the last bit of upper floor render on 1st May, by which time we had moved in with bedroom and en-suite finished.

Clint had also now finished the cladding including all the corner trims and window reveals, so the scaffolding was finally taken down and removed on May 8th. Shane had plenty to do inside plastering the walls and ceilings, only needing assistance with the kitchen and lounge ceilings, which due to their size needed two to get them done in one hit. For this he called in a friend, Darren Burden, another really good tradesman.
First and second fix were very much going on in tandem now, and Clinton who had been in and out as needed, had now moved inside to continue the second fix upstairs where Shane had finished and I had followed up with decoration. When all the internal plastering had been completed, Shane continued where he had left off outside, putting up Rendalath and render around the ground floor.

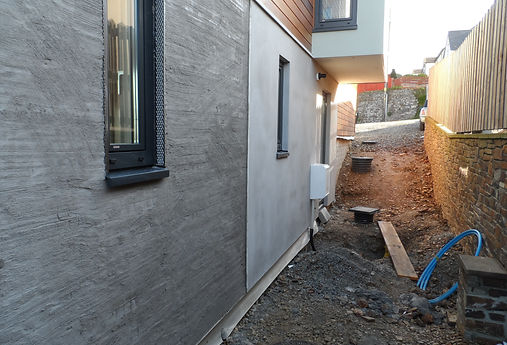
He finished off the last panel on May 30th, and the following day rendered all the window and door reveals.....that was it ...all done. Shane had been with us on and off for just over 8 months. I think he enjoyed being such a big part of this build, I hope so, because we had thoroughly enjoyed his company, and were very thankful for the great job he did for us.

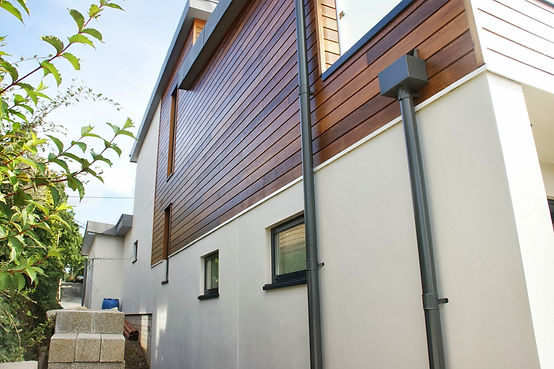

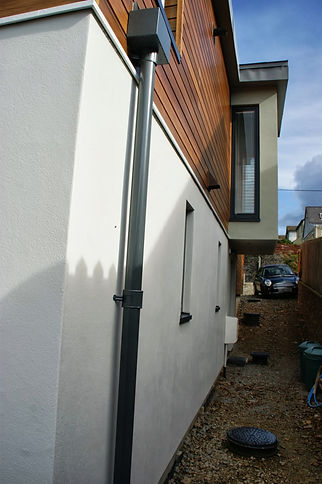
It was just up to me now to apply a couple of coats to the exterior, and install downpipes. We used Sandtex masonary paint, in an off the shelf colour, 'Chalk Hills'. I had a lot of work to do now, to finish the garden, the patio and the surroundings, but there was no pressure to finish it in any particular timescale. That made everything so much more enjoyable, and it would eventually take nearly three years to completely finish every job. I had decided that the laying of the drive would be the very last job...and so it was!
The feelings of anger and disappointment that I had experienced at the hands of Frame UK and their erectors, had been replaced with satisfaction and pleasure of working with some really good 'blokes'.

